7 Version control
Changing a single character in a single file has the potential to render the entire coding solution unusable. In addition, for a structured coding solution, it is unfeasible to continually change a file name (to _v2, _v3, _FINAL, _FINAL_v2 etc) as all references to this file will also need to be updated in light of the latest name. And even if a file hasn’t been changed, how can a reviewer have confidence that the existing files are the same as when they were first reviewed?
7.1 Git
Whilst there are serveral free and open source version control solutions available, git is the most popular. In addition, there is a book available on the website that is free to read and download. Reading only the first three chapters is enough to get familiar with the main concepts and commands associated with using git for version control.
Git creates snapshots of the directory at a point in time. A user can then switch from one version to the next, and see what changes have been made between each snapshot captured. Files and/or subdirectories that are to be excluded from the snapshots (eg that contain sensitive data such as passwords) can simply be listed in a text file file that is named .gitignore.
7.2 Initial set up
Git can be used in the command line. In windows, use the run dialogue to open the command window. Some text editors enable users to right click a file and select the option to “Open containing folder in cmd”.
Figure 7.1: The command window open at the folder containing the code to track
Some common commands are:
cd <folder>which changes directory to the specified folder in the directory.cd ..moves the command line up to the parent folder.dirlists all the files and folders in a given directory.mkdir <new folder name>creates a new folder with the name specified.
Assuming git has been successfully installed, typing git init and pressing enter is all that is required to initiate git version control for this folder and its contents.
The programmer is then free to create files and make changes to existing files.
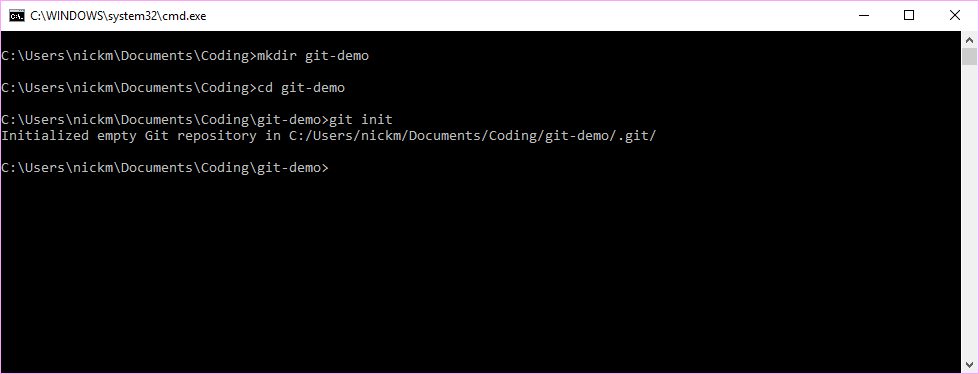
Figure 7.2: Create a new folder and set up version control
All the version control data will be saved in the new .git folder.
7.3 The three states of version control
The working directory is where the changes can be made. Once the user is happy with these changes, they can then be added to the staging area, designating the file(s) that are ready to be committed to the next snapshot to be added to the version control history. The screenshot beneath illustrates a basic example.
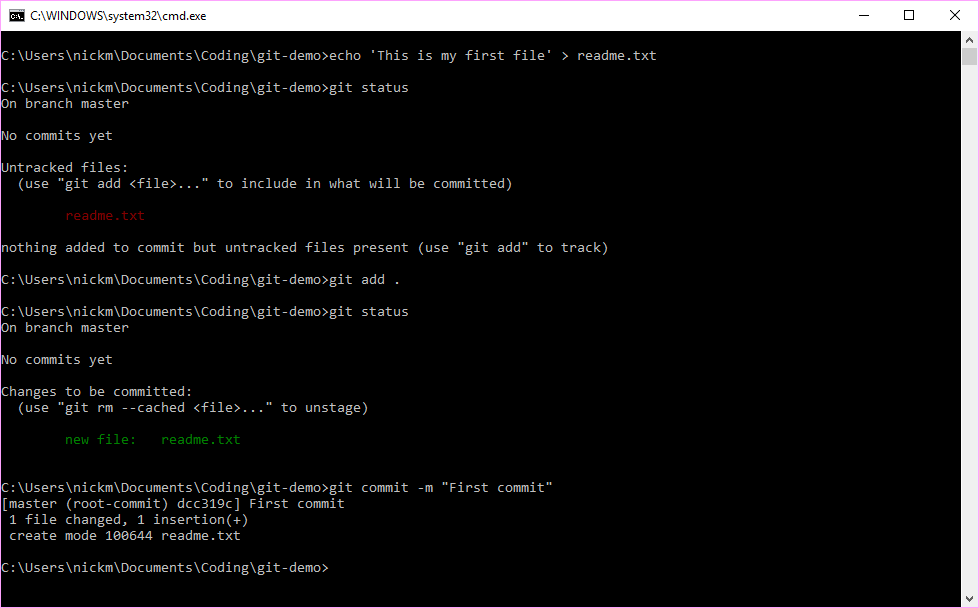
Figure 7.3: Create a new file, add it to the staging area, and then commit it to a new snapshot
Git has already been initialised in the \git-demo working directory. We have then created a new file called readme.txt that has a one line comment in it. The git status command is then run to see what changes have been made since the last commit. We see that the software has identified that a new file has been created and is not currently being tracked (in red). We therefore add this file to the staging area by using the git add . command. (We could have used the git add readme.txt command instead, but the git add . command is shorthand for adding all untracked files to the staging area.)
We then run the git status command again to see the state of our working directory and we can now see that the new readme.txt file has been added to the staging area ready for storing into our next snapshot (in green). We can now commit these changes by using the git commit command. We add the -m "First commit" option to name our commit. We can then view our commit history using the git log command, passing the option --oneline to view the output neatly on one line.
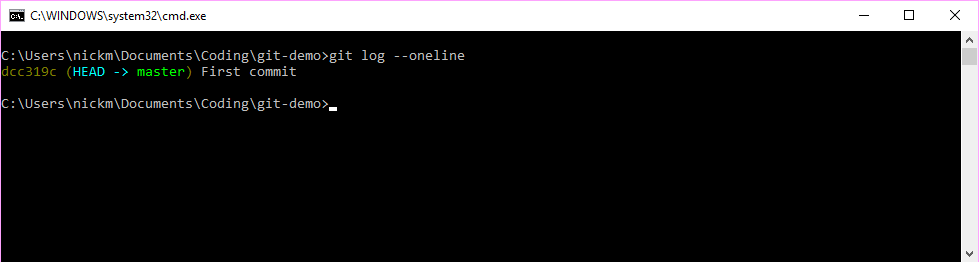
Figure 7.4: Review the commit history
Whilst the inner workings of git are beyond the scope of this guide, it is worth noting some of the underlying mechanics to understand how git manages version control. The random string of characters at the start of the commit in Figure 7.4 is the unique hash code that is returned from passing the contents of the entire directory into the SHA1 hashing function. This 40 character string will change should any file change in the directory. Git therefore stores a snapshot of the directory at these points in time, and any of these snapshots can be restored with the right commands. When another commit is made, a reference to the previous commit is also included in the current commit - this enables a chain of commits to be recorded as the project evolves.
7.4 Making changes
Let’s change the single file in the directory and run the git status command to see what happens.
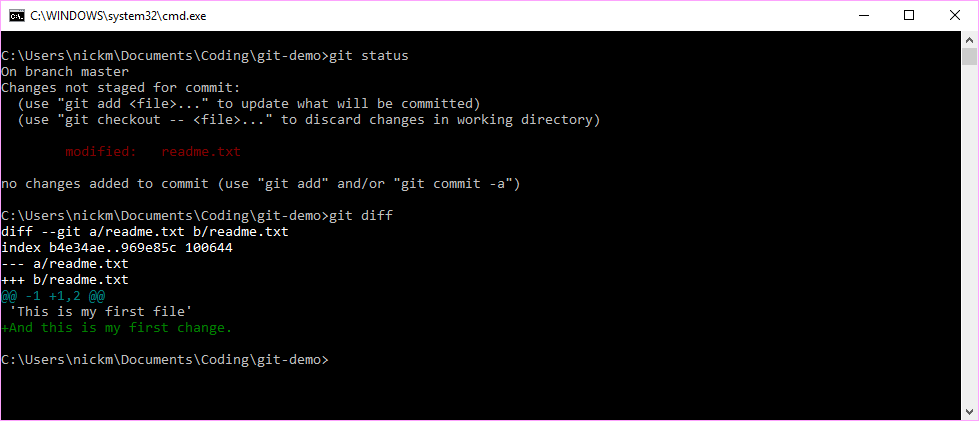
Figure 7.5: Use git to see if any changes have been made since the last commit
The git status command has flagged that the readme.txt file has been modified (in red). The git diff command shows us that there has been one addition (in green). Any deletions would be shown in red. If we are happy with these changes, we can then add them to the staging directory and then make another commit to our version history.
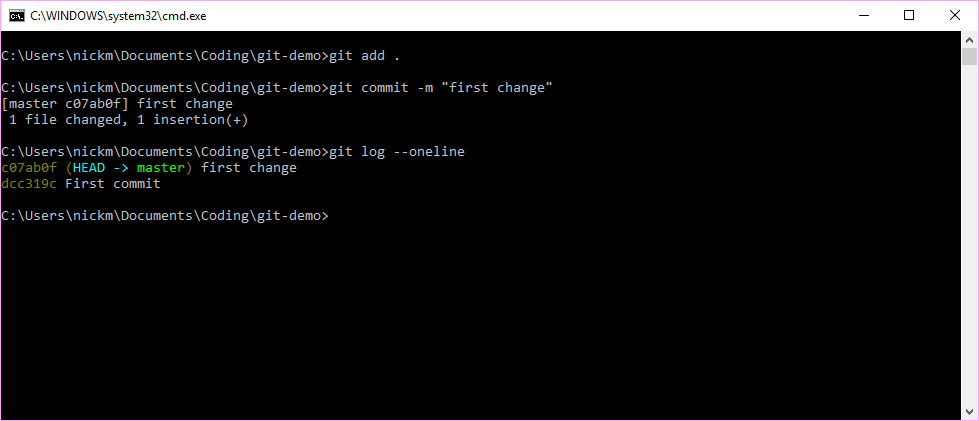
Figure 7.6: After reviewing the changes, they can then be added to the staging aread and then commited
7.5 Branching
You may have been wondering what the HEAD -> master entry in the log was for. This is the default branch that we have been using when commiting our changes to each snapshot. A branch is simply a pointer to a snapshot in our commit history. The master branch is the default branch created, and we have been committing to this branch so far. We can easily create and use several branches, enabling changes to be made by different people in divergent ways without loosing track of all the different versions that are then committed. We know which branch we are on as a special HEAD pointer points to the current branch that we are examining. The current state of our repository is therefore illustrated beneath.
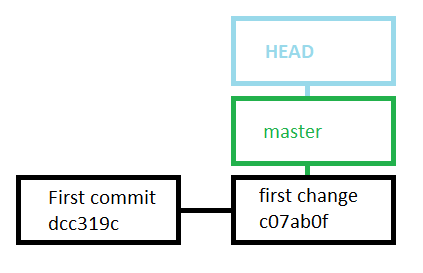
Figure 7.7: The HEAD pointer points to the current branch - the default master branch.
We can create a new branch using git branch dev to create a new branch called dev. We can then move our HEAD to this new branch by using git checkout dev. The git log --oneline command confirms the shift in perspective. Note that the code in the directory has not changed at all with these actions, we are merely registering a new point of view using this light weight branching feature in git.
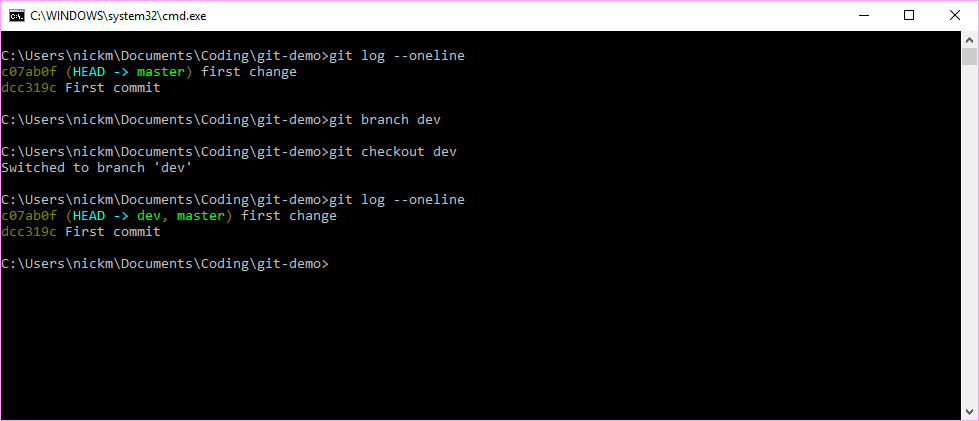
Figure 7.8: Create a new branch called dev and then switch to it.
We can now make some changes on this experimental branch.
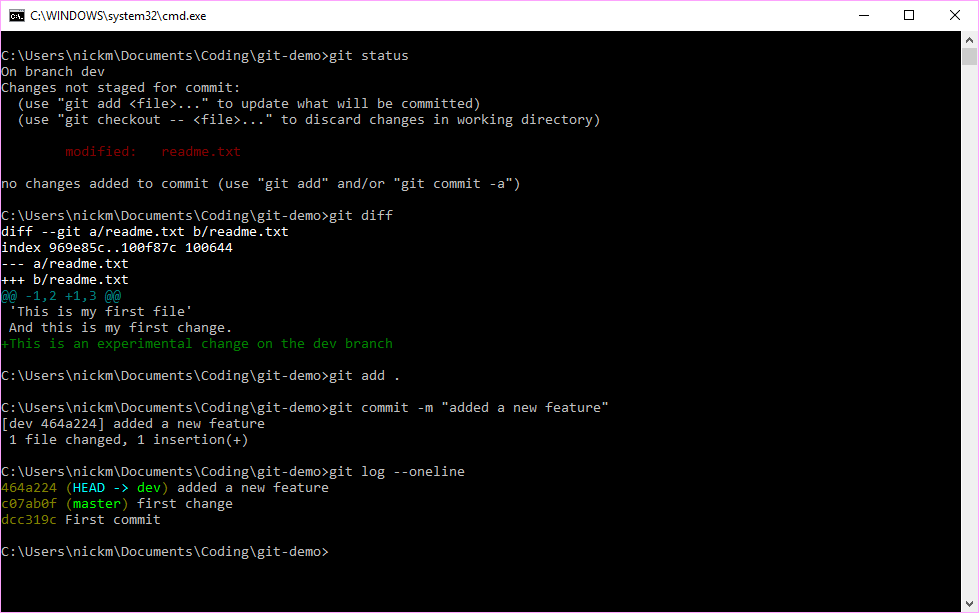
Figure 7.9: Create a new branch called dev and then switch to it.
The git status command flags the files that have been changed, and the git diff command provides the details. As before, if we are happy with these changes then we can git add and git commit to save a new snapshot with these changes in. The differing paths can be seen when we run the git log command. The master branch remains pointing to our second commit, whilst the new branch has added a third.
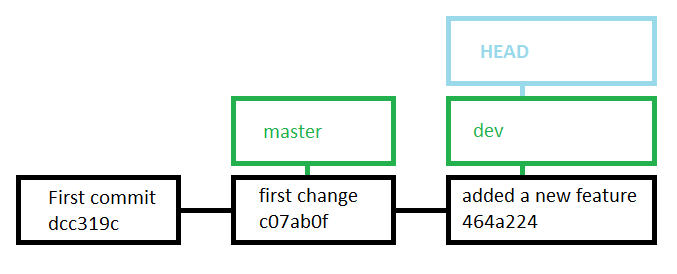
Figure 7.10: The new branch points to our latest commit, whilst our original does not.
We can return the state of our code to that viewed by the master branch by entering the git checkout master command. Note, care should be taken with this command as any unstaged and uncommitted changes would be lost in the move. After our review, if we are happy to add the new dev changes to the main chain, we can then merge the two branches together.

Figure 7.11: We can merge the two versions of the repository that are viewed by the two branches.
As the dev branch was merely one commit down the line from the master branch, the merge command simply applied the Fast-forward strategy, ie updated the master to simply point at the latest commit. Had we made a commit to the master branch before we applied this merge command, then a recursive strategy would have been used instead and a new additional commit would have been created by git that had both changes from the two branches. Were there to be any conflicts between the two branches (ie should one delete a line and another add more detail to the same line), then git would flag these conflicts for manual resolution.
Now that we are happy with the changes made in the experimental branch, we can simply delete this branch. Note, we are deleting the pointer, and not any of the changes that were was associated with it.
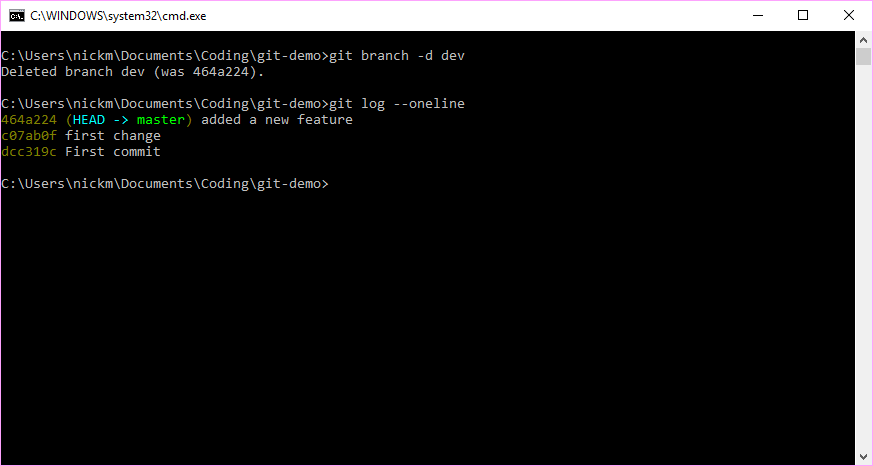
Figure 7.12: The branch can be removed from the commit history without loosing the changes made during its existence.
The advantage of using branches is that the stable version of the code can remain untouched earlier on in the commit history, and newer versions can then be developed. These can bifurcate even further as other people commit their changes to these differing developmental paths (see Section 3.4 of the online git book for some examples).
7.6 Remotes
To further enable collaboration, git enables remotes to be added to repositories. As the name implies, a remote is a remote storage location for your code repository. Technically the remote should simply store a cloned directory with the same commits and branches that a user has on their local machine. However, as remotes can be accessed by multiple users, these two histories can diverge. Git manages this with additional commands such as git pull and git fetch to see what other changes have been made to the remote by other contributors. Once the local changes are ready for deployment, git push can be used to send the local changes to the remote storage destination. Setting up SSH keys is recommended in order to enable encrypted and secure transit of the code to the remote location(s).
7.7 Graphical User Interfaces
When lots of changes have been made, it can be easier to use a Graphical User Interface (GUI) to view the changes in a window rather than in the command prompt. A popular GUI, that also serves as a remote, is github.com. The GUI enables side by side views of changes made to different files, allows for line by line comments, and can commit changes to the repository online.
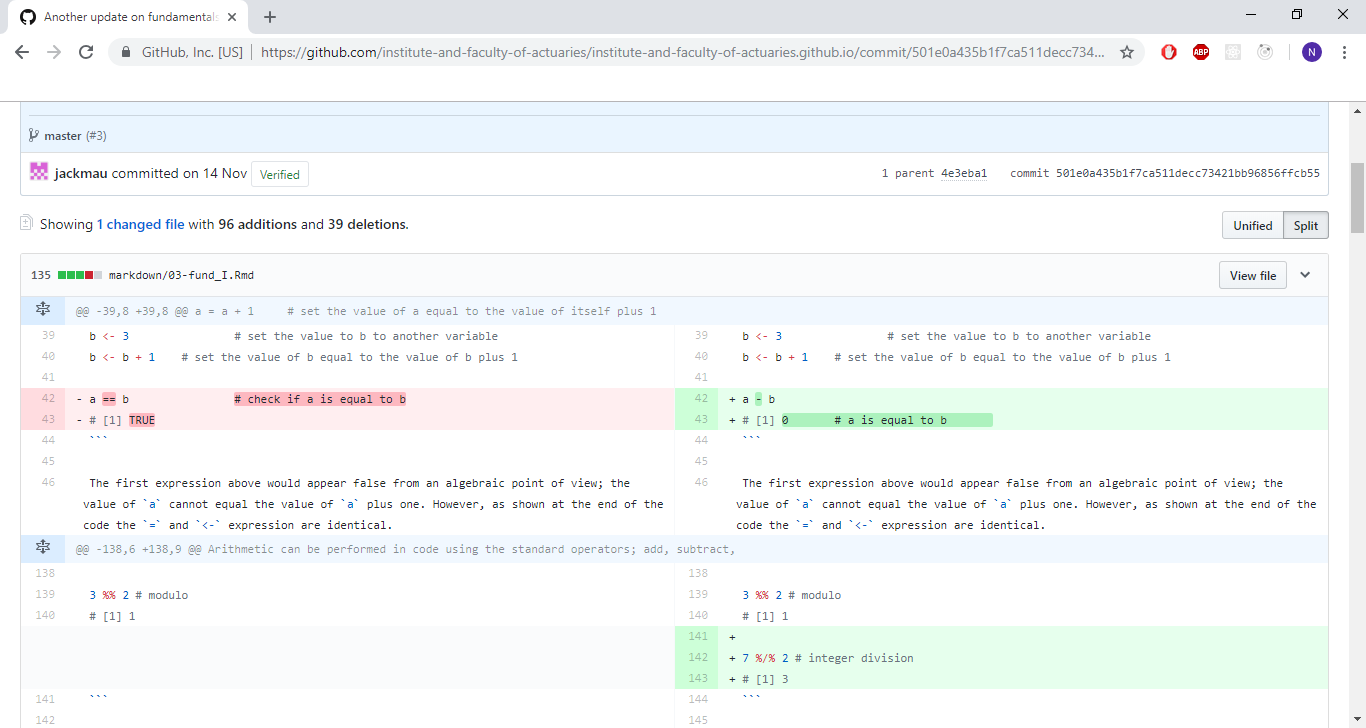
Figure 7.13: Github view of the file differences between two commits.
Github also has other capabilities, such as adding projects to repositories (to manage progress), and the ability to clone/watch other online open source repositories.